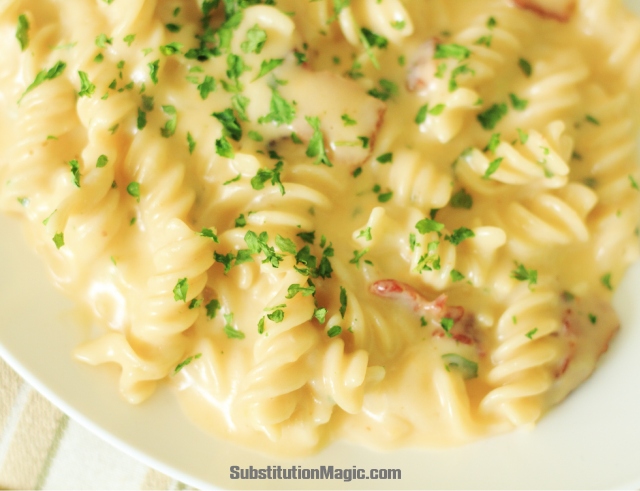
Liquified Gold Bacon Mac & Cheese- Gluten, Dairy, Egg & Soy Free

Gluten Free Mac and Cheese PhotoPina Colada Cupcakes Header

Childhood memories waft through my mind as I reminisce about the warmth, creaminess and comfort of “good old” mac & cheese.  You don’t have to be a kid to appreciate the cozy feelings a spoonful of mac & cheese can bestow upon your mouth.  With an allergy friendly diet,  you can say “YES” to that smooth, golden cheesy flavor.  When my youngest daughter was graduating from high school, I asked her what she wanted served at her graduation open house.  She didn’t hesitate with the answer:  “Your macaroni & cheese, Mom!”  Needless to say, I made enough batches of this recipe for 100 people that day.  This recipe can be made quick and easy in less than 30 minutes on the stovetop or even easier in your slow cooker.  Directions for both will follow.

Liquified Gold Bacon Mac & Cheese

Ingredients:

12 to 16 oz. package uncured nitrate/nitrite free bacon

16 oz. package of spiral, penne or elbow brown rice pasta

1 Tablespoon extra light tasting olive oil (or safflower or canola oil)

1 (13.5 oz.) can of full fat coconut milk (14g of fat)

2 cups Unsweetened So Delicious Dairy Free Coconut Milk

2 cups non-dairy cheddar style cheese (8 oz. package)

1 cup non-dairy mozzarella style cheese (1/2 a package or 4 oz.)

6 Tablespoons dairy/soy free margarine  (You may substitute 2 Tablespoons of reserved bacon grease for 2 Tablespoons of margarine for added flavor.)

1 teaspoon garlic powder

1 Tablespoon onion powder

chopped parsley (to sprinkle on top when serving)

Product Suggestions:

Brown rice pasta:  Tinkyada Brown Rice Pasta (highly recommend)

Unsweetened coconut milk:  So Delicious Dairy Free Unsweetened Coconut Milk beverage

Non-dairy cheddar style cheese:  Daiya Cheddar Style Shreds

Non-dairy mozzarella style cheese:  Daiya Mozzarella Style Shreds

Dairy/soy free margarine:  Earth Balance Natural Buttery Spread (Soy Free Version)

Stovetop Directions:  Boil 4 quarts of water with a dash of salt in a large pot on the stovetop.  While the water is heating, cut the bacon up into 1″ pieces with either a sharp knife or a kitchen scissors.  Fry the bacon pieces in a separate frying pan until crisp.  You don’t need to dry the bacon on paper towels–just use a slotted spoon to transfer the bacon into the macaroni and cheese when it’s time to do so.  Reserve 2 Tablespoons of the bacon grease (if desired).  When the water is boiling, add the brown rice pasta.  Stir occasionally and cook over medium-high heat for only 5 minutes.  Drain the pasta (do not rinse).  Return the noodles back to the large pot and add remaining ingredients (including the bacon).  Stir and cook over medium heat until the non-dairy cheeses are creamy and the noodles are not chewy- but still firm.  If you overcook the noodles, they will get too soft.

Slow Cooker Directions:  Cut up the bacon into 1″ pieces and fry the bacon pieces until crisp.  Place all of the ingredients (including the cooked bacon pieces) into your slow cooker.  Mix together thoroughly.  You don’t have to cook the pasta, you just throw the dry pasta noodles in the slow cooker with the other ingredients (I told you it was easy).  Place the slow cooker on low temp and cook for 1 and a half to 2 hours (stir once or twice) until the noodles are not chewy but still firm.  That’s it!

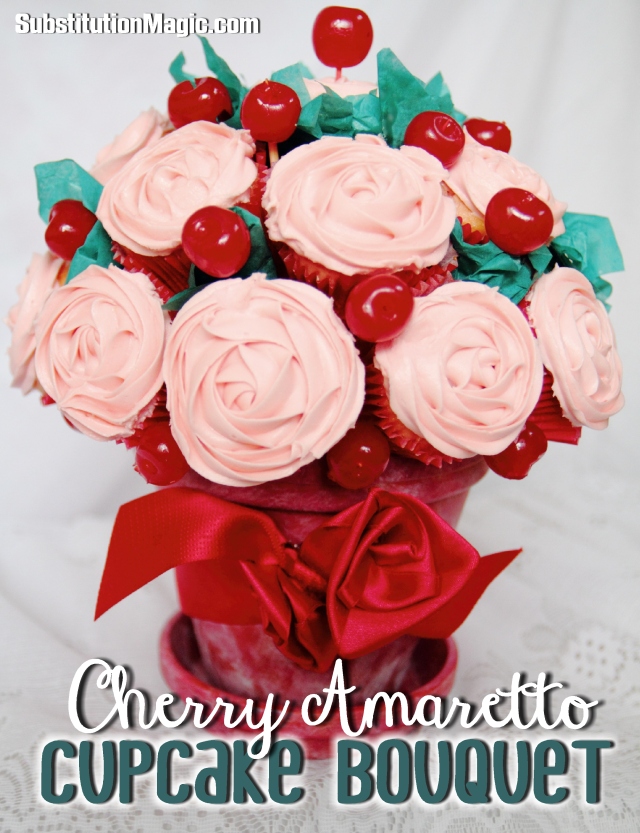
Cherry Amaretto Cupcake Bouquet- Gluten, Dairy, Egg & Soy Free

Gluten Free Cherry Cupcake Bouquet

This bouquet looks good enough to eat!  Oh,wait…it really IS good enough to eat!  What occasion doesn’t deserve a beautiful centerpiece of deliciousness?  Surprise someone with an edible treat for the holidays– such as Valentine’s Day, Easter, Mother’s Day or even Christmas.  Change a ribbon or paint the flower pot a different color and you have a perfect centerpiece for a bridal shower or a wedding.  Not only is this bouquet a feast for the eyes, it also contains wonderful tasting cupcakes to enjoy.  I’ve taken one of my favorite ice cream flavors and transformed it into a flavorful cupcake.  The frosting is irresistible on its own accord, too.  It’s pretty tempting to just scoop a finger-full before you frost the cupcakes.  Go ahead!  I won’t tell anybody.

Cherry Amaretto Cupcake Bouquet- Gluten, Dairy, Egg & Soy Free

Bowl #1:  Egg Replacer.  Whisk together:

2 Tablespoons egg replacer

8 Tablespoons hot water

Bowl #2:  Non-dairy buttermilk:  Whisk together and let sit for 5 minutes:

3/4 cup So Delicious Dairy Free Unsweetened Coconut Milk

2-1/2 teaspoons fresh lemon juice

Then add: 

1/3 cup maraschino cherry juice*

Bowl #3:  Dry ingredients.  Sift together:

2-1/2 cups gluten free flour blend (spoon the flour lightly into the measuring cup–DO NOT SCOOP flour out of the bag with the measuring cup or pack down flour)

1 teaspoon baking powder

1/4 teaspoon sea salt

1/4 teaspoon baking soda

1/2 teaspoon xanthan gum

Bowl #4:  Cream in stand mixer:

1/2 cup dairy/soy free margarine

1-1/2 cups white cane sugar

1 teaspoon vanilla extract

1 teaspoon amaretto extract (see product suggestions)

Frosting Ingredients:

1 cup dairy/soy free margarine

6 Tablespoons palm shortening

6 Tablespoons maraschino cherry juice*

2 teaspoons amaretto extract

8 cups powdered sugar

* You will need a jar of maraschino cherries for this recipe.  Use the juice out of the jar as called for in the recipe and the cherries themselves will be used as decorations in the bouquet.

Product Suggestions:

Egg Replacer:  Ener-G Egg Replacer

Unsweetened Coconut Milk:  So Delicious Dairy Free Unsweetened Coconut Milk

Gluten Free Flour Blend:  Authentic Foods Bette’s Gourmet Featherlight Rice Flour Blend (highly recommend)

Dairy/Soy Free Margarine:  Earth Balance Natural Buttery Spread (Soy Free)

Amaretto Extract:  Silver Cloud Estates Amaretto Natural Flavor Blend (gluten and sugar free)– Can be found at cake/candy supply stores or online.

Palm Shortening:  Spectrum Palm Shortening

VERY IMPORTANT:  When you buy your maraschino cherries, make sure that it says “Gluten-Free” on the jar!  Sometimes they use barley as the natural flavors.  Who figured?

Cupcake Directions:

Preheat oven to 350 degrees.  Add Bowl #1 (egg replacer) to stand mixer Bowl #4 (creamed margarine and sugar mixture).  Mix well.  Alternately add Bowl #3 (dry ingredients) and Bowl #4 (non-dairy buttermilk with cherry juice) beating on low speed until combined.  Spoon batter into baking cups about 2/3 full (should be between 22 to 24 cups).  Do not overfill.  Bake at 350 degrees for 15 to 18 minutes until springs back when touched with your finger.  Cool completely on wire racks before frosting.

Frosting Directions:

In stand mixer bowl, beat margarine and palm shortening on medium speed until smooth.  Gradually add 2 cups powdered sugar, beating well.  Beat in the maraschino cherry juice and the amaretto extract.  Gradually beat the final cups of powdered sugar until it reaches piping consistency.  It will need to be on the stiffer side rather than a soft piping consistency.  If too stiff, add cherry juice a teaspoon at a time.  If too soft, add a bit more powdered sugar. Directions on how to frost the cupcakes as a rose is located below.

Cupcake Bouquet Supplies

Cupcake Bouquet Supplies:

6″ diameter terra cotta flower pot

Multi-surface acrylic paint:  Appropriate for terra cotta surface–whatever colors you desire

Artist paint brush

6″ Styrofoam ball

Package of bamboo skewers

Wilton #1M large open star tip and piping bag

Decorations:

Ribbon for decoration around flower pot

Green tissue paper to simulate leaves

To Start:  Paint your flower pot in any creative way you desire.  The above pictured flower pot was dry brushed with 3 colors:  red, pink and white.  Let your paint dry completely.

Place the Styrofoam ball in the pot.  If it fits snuggly, you’re good.  If it’s kind of loose, put scraps of Styrofoam in the bottom of the pot with some wooden skewers to attach the ball.

How to Pipe a Rose

Rose Frosting Directions:

To pipe your rose:  Start in the middle of the cupcake with your pastry bag straight up (not at an angle).  From the middle, spiral out and continue going around until you reach the edge of the baking cup.  Don’t pipe over the edge or your rose may spread too much.  Spiraling “out” and not “up” is the way to make the frosting look like a rose.  Once you’ve finished piping your frosting roses, place the cupcakes in the refrigerator for at least a half an hour to firm up the roses.  Now you’re ready to put the bouquet together.

Cupcake Bouquet Instruction Photo

Putting it all together:  Tie your ribbon around the flower pot.  You may need to use a hot glue gun to glue the ribbon in place so that it doesn’t slide down.  To place the cupcakes on the ball, cut the bamboo skewers to about 3″ long.  Use 2 skewers per cupcake so that the cupcake is placed firmly and doesn’t twist around.  Start with the bottom row.  Do one cupcake at a time.  Place 2 skewers, with the pointed side out, in the Styrofoam ball until about an inch is sticking out at a 45 degree angle upwards (so the cupcake doesn’t slide off) and gently push the cupcake onto the skewers.  You’ll be able to fit 10 cupcakes on the bottom row.  Be careful not to mess up your beautiful job of frosting as you push the cupcakes on the ball.  After you’ve filled the ball with cupcakes, cut 4″x4″ squares of tissue paper and carefully fill in empty spaces to look like leaves and cover up areas where the Styrofoam ball can be seen.  Then take your jar of maraschino cherries and dry some of the cherries on a paper towel.  Place 3″ bamboo skewers in between cupcakes into the ball and press a cherry on each one.  Use your creativity on how many cherries you’d like to use on the bouquet.  Refrigerate until ready to display and eat.  Enjoy your beautiful creation!

Good Enough to Eat

Tropical Pina Colada Cupcakes (Non-Alcoholic)–Gluten, Dairy, Egg and Soy Free

Gluten Free Pina Colada Cupcake

I was asked to put together a tropical dessert for my niece’s bridal shower with a Hawaiian theme so I came up with this Pina Colada Cupcake recipe.  There were 4 family members with celiac disease invited to the shower who would benefit from an allergy friendly selection.  The cupcakes turned out scrumptious and according to a reliable source, (my trusty husband and taste-tester who’s not gluten free) they were more flavorful and moist than the regular store-bought-gluten-filled cupcakes at the shower.

Tropical Pina Colada Cupcakes (Non-Alcoholic)–Gluten, Dairy, Egg and Soy Free

Bowl #1:  Dry Ingredients.  Sift Together:

1-1/2 cups gluten free flour blend (lightly spoon the flour into the measuring cups.  DO NOT SCOOP or pack down the flour!)

1/2 teaspoon xanthan gum

1 teaspoon baking powder

1 teaspoon baking soda

1/4 teaspoon sea salt

1  (4 serving) box instant vanilla pudding

Bowl #2:  Wet Ingredients.  Cream with electric mixer:

3/4 cup pure cane sugar

1/2 cup coconut oil

2 teaspoons imitation coconut extract

1 teaspoon imitation rum extract

1  (8 oz.) can crushed pineapple (with the juice–DO NOT DRAIN!)

1/4 cup Unsweetened So Delicious Dairy Free Coconut Milk

Bowl #3:  Egg Replacer.  Whisk Together:

1-1/2 Tablespoons egg replacer

1/4 cup + 2 Tablespoons hot water

Frosting Ingredients:

1/2 cup palm shortening

1 teaspoon imitation coconut extract

1/4 cup cream of coconut (whisked)

3 cups powdered sugar

2 to 4 Tablespoons Unsweetened So Delicious Dairy Free Coconut Milk

flaked coconut, if desired (for sprinkling on top)

Product Suggestions:

gluten free flour blend:  Authentic Foods Bette’s Gourmet Featherlight Rice Flour Blend (highly recommend)

instant vanilla pudding:  Jello Instant Vanilla Pudding

egg replacer:  Ener G Egg Replacer

imitation coconut extract:  McCormick’s Imitation Coconut Extract

imitation rum extract:  McCormick’s Imitation Rum Extract

unsweetened coconut milk:  Unsweetened So Delicious Dairy Free Coconut Milk

palm shortening:  Spectrum Palm Shortening

Tip:  Cream of coconut can be found in either the baking aisle of the grocery store or with the mixed drinks (since it is used to make Pina Colada drinks)

Directions:  Preheat oven to 350 degrees.  Mix together bowl #2 (wet ingredients) and bowl #3 (egg replacer) in the bowl of an electric stand mixer (there will still be pineapple lumps).  Gradually add bowl #1 (dry ingredients) and mix until completely combined.  Place baking cup liners in standard size cupcake pan.  Scoop batter with an ice cream scooper into 12 baking cups until about 3/4 full.  Bake at 350 degrees for about 18 to 22 minutes until they turn a deep golden brown and bounce back to the touch.  Cool cupcakes completely before frosting.

Frosting:  Mix ingredients together in the bowl of a stand mixer until smooth and the consistency for piping.  Add more powdered sugar if too thin or more coconut milk (a Tablespoon at a time) if too thick.  Pipe frosting on cooled cupcakes and sprinkle with coconut (if desired).  Store cooled cupcakes in an airtight container in the refrigerator for best texture.

The BEST Baked Beans! – Gluten, Dairy and Soy Free

My family insists they've NEVER had better baked beans than these!

My family insists they’ve NEVER had better baked beans than these!

The BEST Baked Beans! – Gluten, Dairy and Soy Free

Here it is…my most requested recipe!  Wherever I go, I’m asked to bring the baked beans.  Every family get-together I ask “What can I bring?” and they ALWAYS say  “Your baked beans”.  Oddly enough, this is one of my easiest recipes.  If you’d like to try the very BEST baked beans you’ve ever eaten DO NOT– I repeat– DO NOT substitute any ingredients in this recipe!

INGREDIENTS:   DO NOT SUBSTITUTE ANY OTHER BRANDS!

7 cans (16 oz.) B&M “Original” or “Boston’s Best” Baked Beans (The Original may contain soy–the Boston’s Best doesn’t contain soy)

2 lbs. hickory-smoked bacon

2 large onions-chopped

1 cup Organic Heinz ketchup

1  1/2 cups dark brown sugar

1 cup full flavor molasses

DIRECTIONS:

Cut bacon into 1″ pieces.  Brown bacon and chopped onions in large skillet on the stove.  Make sure the bacon is completely browned, but not burned.  DO NOT DRAIN!!!!!  Combine cooked bacon and onions (with their grease) with the rest of the ingredients in a large “oven-safe” pot.  Cover and bake in the oven at 350 degrees for 2-3 hours.  I’ve been told that this tastes best when eaten the next day after being refrigerated and reheated.

TIPS:  I usually double or triple this recipe every time I make it because it is in such high demand.  You can also make this up the day before an event and reheat it in a crock pot on low.  I have a link on the right-hand sidebar of this site for the beans- if they are not available in your local grocery store.

THOUGHTS:

I was given this recipe by a co-worker over 30 years ago.  I made it and everyone went NUTS over it!  The original person that gave me the recipe even asked me why mine tasted better than hers.  I didn’t know…because I’d never eaten it.  The fact is, I don’t like baked beans…AT ALL!  When I was growing up, I had a saying, “I don’t like any kind of beans–except jelly beans!”.  Over the years, my relatives would make this recipe and love it but still ask me why mine tasted better than theirs.  I FINALLY figured out the reason.  I always used the B&M Original Baked Beans while my family and friends substituted “other” brands.  The B&M brand is a “small pea bean” rather than the white or red kidney bean.  You HAVE to use the B&M Original or Boston’s Best Baked Beans to make this recipe work.

My family insists that these are the best baked beans they have EVER, EVER had!!!  So much so, that my daughter has requested that my baked beans are a MUST for her graduation open house.

P.S.  All of the B&M brand baked beans are gluten-free (according to their website).  Some of B&M brand varieties contain soy ingredients.  The most recent time I made this recipe, the “Boston’s Best” variety didn’t contain soy.  In the past, the “Original” variety contained soy, but the ingredients on their website didn’t have soy listed for the “Original”.  Check the can for the most current list of ingredients.

All the Rage Red Velvet Cupcakes – Gluten, Dairy, Egg and Soy Free

Have you been in the mood for something decadent lately but didn’t think you could tempt your taste buds because you have food allergies?  This All the Rage Red Velvet Cupcakes recipe will bring your taste buds back to life.  Say “Hello, Taste Buds!  Nice to meet you again!”

Gluten Free Red Velvet CupcakesAll the Rage Red Velvet Cupcakes-Gluten, Dairy, Egg and Soy Free

INGREDIENTS:

1 cup soy/dairy-free margarine

2 cups white sugar

1 drop imitation butter extract

3 teaspoons egg replacer

4 Tablespoons hot water

3  1/4 cups gluten free all purpose flour blend

1/2 teaspoon xanthan gum

5 Tablespoons cocoa powder

2 teaspoons baking soda

1/2 teaspoon sea salt

1 cup Unsweetened So Delicious Dairy Free Coconut Milk

1 teaspoon distilled vinegar

one bottle (or 2 Tablespoons) red food coloring

2 teaspoons pure vanilla extract

FROSTING INGREDIENTS:

6 oz. Plain Greek Style So Delicious Dairy Free Cultured Coconut Milk

1/2 cup soy/dairy-free margarine

drop of imitation butter extract

1 teaspoon pure vanilla extract

10-12 cups powdered sugar

DIRECTIONS:

Preheat oven to 350 degrees.  You will need 4 bowls for this recipe.  Start with bowl #1 as below:

Bowl #1:  Use a bowl from your stand mixer for this one.  Cream margarine, imitation butter extract and sugar in this bowl.

Bowl #2:  In a small bowl, whisk egg replacer and hot water until frothy.  Set aside.

Bowl #3:  Measure flour by spooning flour gently out of the bag with a spoon into your measuring cup and scraping off the top.  DO NOT SCOOP flour out of the bag with the measuring cup.  Whisk together dry ingredients (all purpose flour blend, xanthan gum, cocoa, baking soda and salt) in a large bowl.

Bowl #4:  Mix wet ingredients (coconut milk, vinegar, food coloring and vanilla).  Let sit for 5 minutes.

Add egg replacer mixture (bowl #2) to creamed mixture (bowl #1).  Mix well with stand mixer.  Add dry ingredient mixture (bowl #3) and wet ingredients (bowl #4) alternating from dry to wet to bowl #1 until well mixed.

Use an ice cream scooper to scoop batter into about 20-24 cupcake liners in a cupcake pan (filling them about 2/3 full).  Bake at 350 degrees for 18-22 minutes until the tops just start to crack.

FROSTING DIRECTIONS:

In mixer, whip greek cultured coconut milk, margarine, imitation butter extract and vanilla.  Add powdered sugar slowly and whip until frosting is thick enough for piping consistency.  Pipe frosting onto cooled cupcakes.  Eat immediately and store leftovers in the refrigerator in an airtight container for no more than 3 days for maximum freshness.  Let refrigerated cupcake set at room temperature for about 15 minutes before eating or microwave the refrigerated cupcake for 20 seconds to soften.

TIPS:  Here are suggestions on brand names of products that will bring the best success to this recipe:

soy/dairy-free margarine:  Earth Balance Natural Buttery Spread Soy Free (red container)

imitation butter extract:  McCormick Imitation Butter Flavor Extract

egg replacer:  Ener-G Egg Replacer

gluten free all purpose flour blend:  Authentic Foods-Bette’s Gourmet Featherlight Rice Flour Blend (this gives a terrific texture and taste to baked goods-I recommend this very highly!)

unsweetened coconut milk:  Unsweetened So Delicious Dairy Free Coconut Milk (don’t substitute anything for this one.  Make sure it’s “Unsweetened” in the green carton–DO NOT use canned coconut milk)

plain greek style cultured coconut milk:  Plain Greek Style So Delicious Cultured Coconut Milk (greek coconut milk yogurt)  Don’t substitute this either.  This will give an authentic cream cheese taste to the frosting.

THOUGHTS:

I was so thrilled when I found out that I could make a frosting that tasted like REAL cream cheese frosting by using greek coconut milk yogurt!  This really opened up a whole new world for me in baking.  I use the greek yogurt (cultured coconut milk) for substitutions that call for sour cream too (like mashed potatoes and banana bread).

Marvelous Millet Bread – Gluten, Dairy, Egg, Soy & Yeast Free

Gluten Free Millet BreadMarvelous Millet Bread

Ahhh…soft, warm bread WITHOUT that gluten-free aftertaste!  Bread has such a mild flavor that it took over a dozen tries to come up with a recipe that overcomes that awful aftertaste that we know so well.

FLOUR MIXTURE:

1 1/4 cups millet flour

1 1/4 cups sweet rice flour superfine

1 cup tapioca flour

1 cup potato starch

2 teaspoons xanthan gum

INGREDIENTS:

3 cups flour mixture

1 1/2 teaspoons xanthan gum

4 teaspoons double-acting baking powder

1/4 teaspoon sea salt

4 Tablespoons sugar

1 Tablespoon brown sugar

3/4 cup So Delicious Unsweetened Coconut Milk

1/4 cup club soda (room temperature)

2 teaspoons apple cider vinegar

1/4 cup extra light tasting olive oil

4 Tablespoons whole ground flaxseed meal

6 Tablespoons hot water

1 Tablespoon Soy Free Earth Balance Margarine

DIRECTIONS:

Measure flours to make flour mixture by lightly spooning flour into measuring cups.  Gently scrape the top off with a knife and place flours (and xanthan gum) into a large bowl.  Do not scoop flours out of the bag with the measuring cup or it will pack down and you will have too much flour.  Set bowl aside.  Whisk together flaxseed meal and hot water in a separate small bowl (this is replacing your eggs).    Set aside for it to gel for a few minutes.  In a medium bowl, whisk together 3 cups of the flour mixture (make sure you lightly spoon this to measure also),  xanthan gum, baking powder, salt and sugars.  Store leftover flour mixture in an airtight container in a cool dry place for future use.  Warm coconut milk to 110-115 degrees.  Place warmed coconut milk and vinegar in a bowl of a stand mixer fitted with the paddle attachment or dough kneading hook.  Mix and let set for a few minutes.  Add club soda, olive oil and flaxseed meal mixture and mix.  Add dry ingredients slowly.  Beat on low to medium speed for 6 minutes.  Make sure that all of the flour is mixed in the dough.  Pour mixture into a greased loaf pan.  The dough will be very thick.  Smooth the top with a spatula.  Place the pan in a cool oven (oven that’s NOT turned on) covered with greased wax paper.  Place a bowl of hot water on a rack underneath the pan and close the oven door.  Let rise for an hour.  Take out the loaf pan and the bowl of water from the oven and preheat the oven to 375 degrees.  Bake bread for 20 minutes uncovered.  Spread the margarine over the top of the bread and bake additional 35 minutes until golden brown.  Place on a rack to cool for about 10 minutes and remove from pan.  Store in an airtight plastic bag after bread has cooled.  After 24 hours refrigerate leftovers.  This bread is really tasty toasted or microwaved after it has been refrigerated.

TIPS:

One helpful tip while measuring your flours:  I usually place a baking sheet underneath the bag of flour and the bowl while I’m scooping the flour out of the bag with a spoon and placing it into the measuring cup and then scraping off the excess with a knife unto the baking sheet.  After I’m done measuring that particular flour, I pour the excess that landed unto the baking sheet back into the bag of flour.  Therefore, saving the excess mess and expense.  Never pack down gluten-free flours.  The chemistry between the flours and the moisture is very precise.

Make sure that your bread is uncovered in the oven.  One time I made the exact same loaf of bread (one with yeast and one without).  I covered both loaves with foil after 20 minutes in the oven because the yeast bread gets too brown and I expected the “non-yeast” to do the same.  When I pulled both loaves out of the oven the “non-yeast” bread was almost white compared to the dark brown yeasted bread.  The next time I made the “non-yeast” bread, I didn’t cover it at all and brushed margarine on the top after 20 minutes of baking to get it that beautiful golden brown.  It came out just perfect!

The reason behind the bowl of hot water in the oven while the dough is rising is to keep the air in the oven warm and moist.  I have a double oven and I let the dough rise in one oven and preheat the other oven about 10 minutes before the dough is ready to bake.  This can be tricky—I’ve almost turned on the wrong oven at times!  What a disaster that would have been!  Don’t be concerned that the dough doesn’t rise above the pan after an hour.  Most of the rising will happen while it is baking.  I’ve baked the yeast bread and non-yeast bread side by side and the non-yeast bread rose HIGHER than the yeasted one AFTER baking even though the “yeasted” bread rose more BEFORE baking.

Make sure you don’t use the canned coconut milk in this recipe.  You need to have the lighter milk that comes in a carton.  You can use other brands of cartons of coconut milk, but if it isn’t “unsweetened” cut back a little on the sugar.

I would not suggest substituting any of the flours in this recipe or you might get an aftertaste or different texture than you’d like.  The sweet rice flour superfine helps this bread to have a softer, less crumbly texture.  I use the Authentic Foods brand.  The millet flour gives it the taste.  The flaxseed meal also gives some of the good flavor.  I’m not sure if this was a fluke, but I bought Bob’s Red Mill Whole Ground Flaxseed Meal and the taste was sweet and mild.  But I also had a bag of the organic of the same brand and it had a really strong, grassy smell to it and gave a saltier flavor to the bread that I didn’t like (I’m pretty picky).  I wasn’t quite sure what that was all about.  Just make sure that your flaxseed meal doesn’t have a strong smell when you open the bag.

THOUGHTS:

It takes about 2 hours and 15 minutes to make this bread, but it’s worth it!  I usually make 2 loaves at a time.  If you try this recipe, I’d love your feedback!

Pistachio Dark Chocolate Pie- Gluten, Dairy, Egg and Soy Free

Your Taste Buds will Thank You

Your Taste Buds will Thank You

One usually equates a light green color in a pie to be the flavor of mint.  Not so with this pie!  It has a unique combination of pistachio and chocolate that is almost addicting.

Pistachio Dark Chocolate Pie

INGREDIENTS:

2  (13.5 oz.) cans coconut milk- full fat (14g)

1/3 cup powdered sugar

3 Tablespoons tapioca flour

2 boxes (4 serving) instant pistachio pudding

1 package (8 oz.) gluten-free dark chocolate sandwich creme cookies

3 Tablespoons Spectrum palm shortening

DIRECTIONS:

Empty the 2 cans of coconut milk into a glass container.  The milk and oil will be separated.  Whisk them together until smooth.  Cover and refrigerate overnite.  The next day, set aside 3 of the cookies.  Crush the remainder of the cookies into crumbs.  You will be crushing the entire cookie–including the creme center.  Melt the palm shortening.  Combine the melted palm shortening with the crumbs and press firmly into a greased 9″ pie plate.  Press the crumbs all the way up the sides.  Preheat oven to 350 degrees.  Bake cookie crust for 10 minutes.  Cool crust completely on a baking rack.  The crust has to be cool to the touch.  Whip the refrigerated coconut milk with an electric mixer.  Add the 2 boxes of pistachio pudding and continue to whip until soft peaks.  Add powdered sugar and the tapioca flour and whip together for a few minutes.  Place pistachio mixture into the cooled pie crust.  Spread some nice swirls on the top with a butter knife.  Crush one of the remaining cookies and sprinkle on top.  Place the last 2 cookies in the center of the pie decoratively.  Refrigerate at least 3 hours before serving.

TIPS:

The term “Easy as Pie” surely fits this recipe.  It’s easy to make but does take some time for items to cool.  Concerning the ingredients:  Make sure that your cans of coconut milk are not the lite version.  They need to be full fat.  Some brands offer “lite” and “classic”.  You’ll want the “classic” which is generally around 14 grams of fat.  I usually use the JELLO brand of pistachio pudding.  Kraft foods state on their website that the majority of their puddings are gluten-free (except flavors like “cookies and creme”)  The original recipe that I modified uses Oreo cookies for the crust.  I use the Kinnikinnick brand “KinniToos (K Toos) Chocolate Sandwich Creme Cookies”.  I feel they taste the closet to Oreo cookies.  The K Toos do contain soy lecithin and may contain traces of egg.  These are in small amounts.

THOUGHTS:

This is a modified version of my own recipe that I made several years ago that I called “Pistachio Oreo Pie”.  The original recipe had an Oreo cookie crust made with butter, pistachio pudding, Dreamwhip and milk.  I had never seen pistachio and chocolate put together before.  When I tried it, I fell in love.  And even better was the combination of Oreos and pistachio pudding!  When I was diagnosed with Celiac Disease and multiple intolerances I decided to try to replicate my favorite pie recipe.  I didn’t know if I could get it close to the original version.  I was pleasantly surprised when I tasted this recipe.  The first thing that people say when they see this pie is “Oh, it’s a mint chocolate pie”.  Well….surprise!  It’s even better!

Puffy-n-Sweet Gluten Free Sugar Cookies- Gluten, Dairy, Egg and Soy Free

Gluten Free Sugar Cookies

Puffy-n-Sweet Gluten Free Sugar Cookies

Ingredients:

1 cup white rice flour

1/2 cup tapioca flour

1  1/2 cups sweet rice flour superfine

1  1/2 cups certified gluten-free oat flour

5 teaspoons aluminum free double-acting baking powder

pinch of salt

1  1/2 cups Earth Balance (soy free version) margarine

Drop of McCormick Imitation Butter Flavor

1  1/2 cups white sugar

1  1/2 teaspoons pure almond extract

4  1/2 teaspoons Ener-G egg replacer

6 Tablespoons warm water

Frosting:

5 cups powdered sugar

1/3 cup Earth Balance (soy free version) margarine

Drop of McCormick Imitation Butter Extract

1 Tablespoon pure vanilla extract

7-8 Tablespoons coconut or rice milk

Directions:

Measure flours by lightly scooping them into the measuring cups and placing them in a large bowl.  Never pack down gluten-free flours.  Add the rest of the dry ingredients and whisk all the dry ingredients together thoroughly.  In a separate small bowl, whisk the egg replacer and the warm water until frothy.  Set aside.  In another larger bowl cream the margarine, imitation butter extract, sugar, and almond extract.  Add egg replacer to creamed sugar and mix together.  Gradually add dry ingredients and mix thoroughly.  The dough will be pretty thick.  Cover the bowl with plastic wrap and refrigerate for at least 2 hours.  Line baking sheets with parchment paper.  Preheat oven to 350 degrees with rack in the middle of the oven.  Roll dough on floured (rice flour) surface until almost 1/2″ thick.  Cut out shapes using a cookie cutter that is no larger than 2″ wide.  The cookie cutter should also be at least 7/8″ deep to be able to cut through the 1/2″ rolled dough.  Bake at 350 degrees for about 8 minutes or until cookies are set and cracking but not brown.  Combine frosting ingredients with a mixer adding the coconut (or rice) milk gradually until the frosting reaches the desired consistency.  Frost cooled cookies and have fun decorating!  Store the cookies in an air tight container.  Un-frosted cookie leftovers may be frozen.

Thoughts and Tips:

At last!  A puffy, soft gluten-free sugar cookie that tastes like a REAL sugar cookie!  After scouring recipes for some time, I finally found some recipes that I could tweak and modify to be gluten, dairy, egg and soy free.  It was difficult to find a way to make gluten-free sugar cookies that weren’t flat and hard as a rock.  But this recipe finally breaks the crunchy barrier and rides into soft sugar cookie heaven.  I made a batch for the first time at Christmas when our 2 college kids were home (hoping and praying that they would turn out).  Well, that batch was devoured in the first couple of days the kids were home.  So we decided to make a couple of batches as a family.  Boy!  Was that a zoo!  Instead of nice “Christmas” shapes we ended up with Star Wars, gnomes, and any weird shape they could come up with.  We did have a good time making and eating them though.  My college daughter, who is gluten-free, was thrilled to have real sugar cookies.  I think she said she gained 6 pounds over Christmas alone.  My college son, who is NOT gluten-free, did not complain one bit that he HAD to eat gluten-free cookies!  He just HAD to eat practically half the container.

TIPS:  The first tip is to make sure that you measure the gluten-free flours by lightly spooning the flour into the measuring cups.  I usually put a baking tray underneath the bag of flour and measuring cup and lightly scoop with the spoon and then gently scrape the excess off with a knife.  Then I use the tray to pour as much of the excess back into the bag of flour.  That stuff is expensive, I don’t want to waste a bit of it!  Just make sure you don’t take the measuring cup and scoop it out of the bag.  That will pack it down and your cookies will be too dry.  You may be wondering what is “sweet rice flour superfine”?     Sweet rice flour is a stickier flour.  I usually buy the Authentic Foods brand which is ground superfine.  You can usually find it at your local Health Food store.  Always make sure that your oat flour is “certified gluten-free”.  Some people with Celiac Disease or a gluten intolerance can’t tolerate oats at all (even certified).  Others are fine with the certified gluten-free oats.  The Earth Balance margarine is also available at most local Health Food stores.  They have several different versions of it.  If you are soy-free, the red carton is the one you want.  I’ve found that if my local Health Food store doesn’t carry something, they are usually open to ordering it or making a special order for you personally (although you usually have to buy an entire case).  You will use most of your container of the margarine for the cookies and the frosting.  You may also be wondering why the “drop of imitation butter extract”?  I find that the flavor of the margarine is not very buttery.  Just one drop will help with that buttery taste that you need in a sugar cookie.  The almond extract and the imitation butter extract that I use is the “McCormick” brand because they say “gluten-free” right on the box.

After you’ve chilled your dough and are ready to start cutting out your shapes you’ll need to make sure that your cookie cutters are not too big.  I found that if you have cutters that are larger than 2″ wide the cookies end up way too big.  I know that they seem like really small cookie cutters (at 2″) but the cookies end up puffing up a lot in the oven and will be much bigger than the 2″ of the cutter.  It’s much better to have more cookies that are smaller with this recipe.  You also need to make sure that your cookie cutter is deep enough.  I have several cutters that are only about a 1/4″ deep and they won’t cut through dough that is almost 1/2″ thick.  Make sure that your cookie cutters are at least 7/8″ deep.  Also place your cookies about an inch apart on the tray because they do puff.  Don’t overbake these cookies.  They are done when they are set and cracking on the surface (after about 8 minutes of baking).  These cookies should not be browned at all.

Store these cookies in an airtight container.  They stay fresh for about a week.  I like to freeze some in small baggies for sneaking out of the freezer at future times.  I freeze them with the frosting and everything (just out of pure laziness) but they freeze better without frosting and then frosting them with fresh frosting when they’ve defrosted.

These puffy -n- sweet sugar cookies are great for Valentine’s Day, Christmas or any occasion!  I hope you enjoy them as much as my family does!

Gluten, Dairy, Soy, Nut & Yeast Free Rice Crispy Treats

Tastes just like the Original Recipe

Tastes just like the Original Recipe

 
 Gluten, Dairy, Soy, Nut and Yeast Free Rice Crispy Treats Recipe

INGREDIENTS:

12 oz. box Gluten-Free Kellogg’s Rice Krispies Cereal (brown box)

One and 1/4 package Kraft Jet-Puffed Large Marshmallows (one package plus 10 large marshmallows)

1/2 cup Spectrum Palm Shortening

1/2 teaspoon McCormick Imitation Butter Flavor

VARIATIONS:

Post Fruity Pebbles with one package Kraft Strawberry Marshmallows

Post Cocoa Pebbles with one package Kraft Regular Marshmallows

DIRECTIONS:

Microwave the palm shortening in a very large microwave safe bowl until melted.  Add butter flavoring and mix.  Add marshmallows and microwave for 2 minutes.  Stir.  Add the cereal and stir until well mixed.  Press into a greased 9 x 13 pan with greased hands.  When cool cut into squares.  ENJOY!

You CAN have a treat that tastes just like the original recipe!  This recipe is based on one of the easiest- yet most universally loved- treat among kids and adults alike.  Now that Kellogg’s has come out with a gluten-free version of their Rice Krispies cereal you won’t be able to tell the difference from the original gluten/dairy version and this recipe.  I did get “brand-specific” in this recipe for a few reasons:  Most of the gluten-free crispy rice cereals are fairly tasty, but not quite the same texture as the brand name Rice Krispies.  Make sure you get the brown box that says it’s gluten-free.  The original Rice Krispies cereal in the blue box has malt in it.  The reason for the Kraft marshmallows is two-fold:  The Kraft brand specifies that their marshmallows are gluten-free (most marshmallows are) but also the Kraft marshmallows seem to be puffier and melt better in this recipe.  The palm shortening can be any brand (I just found it easier to find the Spectrum brand in the stores.  Health Food stores and some large grocery stores carry this item).  Palm shortening is a great non-dairy substitute for butter or shortening in most recipes.  In this recipe I added a half teaspoon of the imitation butter flavoring which gives the palm shortening that buttery flavor that is missing from not being able to use real butter.  The McCormick brand of imitation butter flavor has “A gluten-free food” written right on the box.  (You can find the imitation butter flavor along side the imitation vanilla extracts and other extracts in the baking aisle at the grocery store).  I use this butter flavoring quite often in other recipes.  I like to mix it with the dairy/soy free Earth Balance margarine to give it more of a buttery “kick” on baked potatoes, mashed potatoes or popcorn.

You may be wondering what is “one and 1/4 packages of marshmallows”?  One package of Kraft large marshmallows is about 40 marshmallows.  I used about 50 marshmallows in this recipe-a whole package plus a handful of 10 more large marshmallows.  With the smaller boxes of cereal such as in the variations- Post Fruity Pebbles and Post Cocoa Pebbles- you only need one package of marshmallows (everything else is the same).

There are so many variations with this treat.  One of my favorites is to melt Enjoy Life (gluten, dairy, soy free) mini chocolate chips and spread on top of the regular or chocolate crispy treats.

This treat is so scrumptious that no one will know that they are gluten, dairy, soy, nut & yeast free (unless you tell them)!Gluten Free Fruity & Cocoa Pebbles

Basic White Sauce or Cream Soup Base-Gluten, Dairy & Soy Free (Optional: Corn Free)

Unsweetened Coconut Milk is your Best Friend

Unsweetened Coconut Milk is your Best Friend

When I think of comfort foods, I think Ahhhhhh!  When I was diagnosed with Celiac Disease (coupled with a gluten intolerance, dairy, soy, egg and yeast intolerances) I thought that the world of taste was gone forever!!!!  I had stepped into the world of “can’t”.  I can’t have this, I can’t have that…so I went on a quest.  My quest was for substitutes for the foods I couldn’t eat.  Not just “substitutes”, but TASTY substitutes.  Substitutes that would make my dishes taste close enough to the originals that I could bring them to a potluck and no one would know they were modified.  Being an artist by trade (and to the core) I put my creativity to work.  This is one of the first substitutes I came across (and my favorite).  Unsweetened (light) coconut milk.  I thought for sure that I’d only be able to use unsweetened coconut milk in baked goods because it would have that “coconut” aftertaste.  I was pleasantly surprised to find it rather mild with NO aftertaste.  Which makes it the perfect choice to mimic milk (perfect texture too).  I’m not talking about the cans of coconut milk that you buy on the shelf at the grocery store.  Those are pretty high fat and do have that coconut aftertaste.  I do have GREAT recipes using the canned coconut milk too.  (But that will be on a later day.)  The coconut milk I’m talking about here comes in cartons.  The brand name that I use is “So Delicious Dairy Free”.  I find it at my local health food store.  They carry it in the refrigerated section in a half-gallon carton that looks like all of the other milks.  It comes in chocolate, vanilla and unsweetened, to name a few.  The unsweetened lighter version used in the recipe is in the green carton of the “So Delicious Dairy Free” brand.  My local health food store also carries it unrefrigerated in a rectangle green carton on the shelf.  I use this item so much that I’ll pick up a refrigerated carton and several unrefrigerated boxes every time I grace the store.  Look for “So Delicious Dairy Free Unsweetened Coconut Milk” in the green carton.  You’ll be glad you did.  Now onto the recipe…This recipe is for the basic white sauce that can be used as a gravy or as a base for a creamed soup.  The original recipe is from the one my mom used to make when I was a kid that she called “Chipped Beef on Toast” or “Tuna and Hard-Boiled Eggs on Toast”.   Yummy, versatile, very simple and oh, so, comforting!  The original recipe:  2 Tablespoons Butter and 2 Tablespoons Flour per 1 cup of Milk.  Well…I had to find substitutes for all 3 of the ingredients to make my recipes work.  I love making Creamy Potato Bacon Soup out of this cream base.  I could eat it practically every day.  Here is my recipe:

Basic White Sauce or Cream Soup Base– Gluten, Dairy & Soy Free (Optional:  Corn Free)

2 Tablespoons Extra Light Olive Oil

2 Tablespoons Cornstarch (or alternative starches:  tapioca starch, arrowroot, etc.  SEE “TIPS” BELOW)

1 Cup “So Delicious Dairy Free UNSWEETENED Coconut Milk”

Plenty of spices:  Salt, Onion Powder, Garlic Powder, Pepper, etc.—to taste— but for me, more is better

This recipe should be multiplied to the amount you want to achieve.  For instance, if you’re making a creamed soup and you want 5 cups of the cream sauce— multiply everything by 5:  (Example:  10 Tablespoons Olive Oil,   10 Tablespoons Cornstarch, to 5 Cups Unsweetened Coconut Milk.)  If your soup is too thick for your taste, add more coconut milk until it reaches the consistency you’d like.

DIRECTIONS:  In a saucepan on the stove, heat the Extra Light Olive Oil on medium heat and add the Cornstarch.  Stir until combined.  You’ll need to move quickly once the oil and cornstarch are combined.  Add the Coconut Milk all at once and stir constantly over medium heat until mixture thickens (usually around 5-10 minutes).  Add your spices very generously.  Remember, it’s pretty mild so the sauce will take on whatever flavorings you add to it.  I use a lot of onion powder and garlic powder in this sauce.  If you find that your sauce is too thick at this point for what you’re using it for, add more of the unsweetened coconut milk a quarter cup at a time until you reach your optimum consistency.

TIPS:  The reason I use cornstarch is because of its desired texture and thickening qualities.  If you’re not able to use corn in your recipes, by all means, use another starch.  Being the picky eater I am, I happen to not like the texture of the tapioca starch.  It gets too gooey and somewhat rubbery for me.  Although it doesn’t change the taste, fortunately.  Always use caution when using arrowroot as your starch as it can lose its thickening abilities at higher temps for periods of time.  You may also substitute a margarine for the olive oil.  The only margarine that I’ve found that I can have is the Earth Balance–No Soy Version—in the red container.  I found that the water content in margarine sometimes doesn’t work as well as the olive oil.  The only thing that I would stress NOT substituting in this recipe is the unsweetened coconut milk.  That is the most important ingredient!  Finding this substitute changed completely how I could cook!!

APPLICATIONS:  This recipe works great for creamed soups such as:  Creamy Potato Bacon Soup, Chicken Wild Rice Soup, New England Clam Chowder, Cream of Broccoli, Cream of Chicken, Cream of Mushroom, etc. etc. etc!    You may substitute this in your casseroles which call for Cream of Mushroom soup.  Personally, I can’t have mushrooms either so I substitute sautéed onions and cooked chicken in the sauce when a casserole calls for the Cream of Mushroom.  You may also add cheese substitutes to the sauce for a cheesy flavor.  I would suggest the “CHREESE” brand packets–either alfredo style or cheddar for some added flavor.